Why Mold Forms Around Window Reveals — and How to Stop It
Unsplash, GlassBase.com
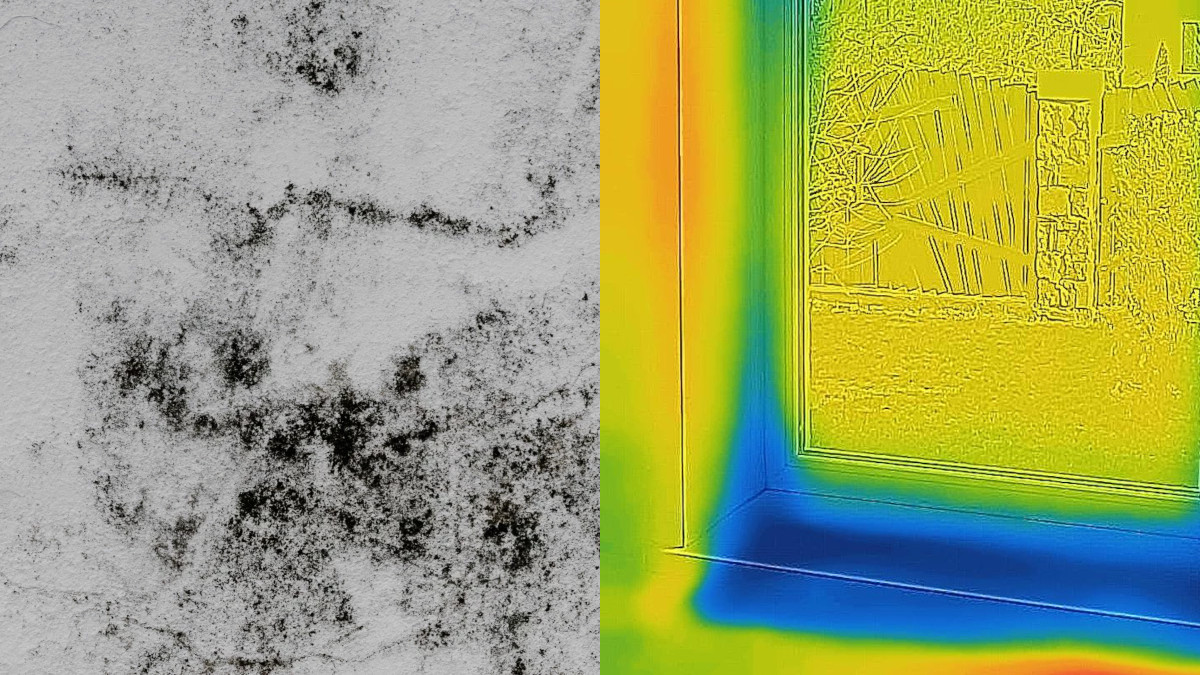
Low surface temperatures and high humidity promote mold growth
Mold on a window reveal is not a random visitor. It follows a specific chain of events: excess moisture in the air, condensation on a cold surface, then mold colonizing the wet film. Understand each link, and the fix stops being guesswork.
The chain: moisture, condensation, mold
Warm air holds more water vapor than cold air. When that warm, humid indoor air reaches a cold surface — glass, a metal spacer, a vinyl frame, or the drywall return around a window — it cools rapidly. Cool air can't hold as much moisture, so the excess drops out as liquid water. That's condensation, and it happens the moment a surface temperature dips below the dew point of the air touching it, according to the U.S. Environmental Protection Agency (EPA), which explains the effect using a simple comparison: a cold drink sweating on a humid day.
ENERGY STAR, the joint EPA and U.S. Department of Energy program, describes the same mechanism specifically for windows: water condenses, and sometimes freezes, on the interior surface whenever the window or frame gets too cold relative to the indoor dew point.
Condensation by itself isn't mold. Mold needs a food source (wood, dust, drywall paper, caulk) and standing moisture for a sustained period. The EPA is specific about the timeline: give a wet surface 24 to 48 hours, and mold growth becomes likely. A window reveal that fogs up every cold morning and never fully dries between cycles meets that condition daily through an entire winter.
Why reveals are colder than the rest of the wall: thermal bridging
A window reveal — the recessed area around the sash where the frame meets the wall — is often the coldest interior surface in a room, colder than the glass itself in many installations. The reason is thermal bridging: a path of higher-conductivity material that carries heat out of the house faster than the surrounding insulated wall.
Window frames themselves can be thermal bridges. Aluminum conducts heat far more efficiently than the wall around it. Research compiled by building scientists puts standard aluminum's conductivity in the range of 1,400 to 1,700 BTU-in/hr-ft²-°F, versus roughly 200 to 400 BTU-in/hr-ft²-°F for aluminum frames with a polyamide thermal break. Without that break, an aluminum frame stays close to outdoor temperature in winter, so its interior face — and the reveal around it — runs cold enough to hit dew point even at moderate indoor humidity.
The reveal itself adds a second bridge. Building science literature reviewed by the U.S. Department of Energy and Oak Ridge National Laboratory identifies the connection between the window frame and the rough opening as a location where structural framing, fasteners, and gaps in insulation create a direct conductive path around the window's own insulated glazing. Analysis from thermal-bridging specification firm Thermal Bridging Solutions notes that this transition area is excluded from a window's published U-factor rating entirely — the U-factor describes the window assembly, not how it's installed — so two identical windows can perform very differently depending on how well the installer insulated and air-sealed the rough opening.
Cold reveal, warm humid room air: the surface goes below dew point before the rest of the wall does, and condensation shows up there first.
Where the excess moisture comes from
A cold surface only becomes a mold problem when there's enough water vapor in the air to condense on it. The EPA lists the common indoor sources that push relative humidity up:
- Cooking and boiling water
- Showering and bathing
- Clothes dryers vented indoors or leaking exhaust
- Humidifiers
- Unvented gas appliances
- Everyday respiration and perspiration from occupants
- Firewood or green building materials still drying out
- Poor ventilation that traps all of the above indoors
Modern, tightly sealed homes make this worse, not better. Natural Resources Canada's ENERGY STAR program (administered jointly with the EPA in Canada) notes that airtight construction — good for energy bills — holds moisture inside that older, leakier houses would have exchanged with outdoor air. Without deliberate ventilation, that moisture has nowhere to go except onto the coldest surfaces it can find.
The EPA sets a practical target: keep indoor relative humidity below 60 percent, and ideally between 30 and 50 percent. Above that range, condensation risk climbs sharply on any surface that runs cold, window reveals included.
Preventing and eliminating condensation on reveals
The fix works on both sides of the equation: lower the moisture load, and raise the surface temperature.
Lower indoor humidity
- Run bathroom and kitchen exhaust fans during and after cooking or showering, and vent them outdoors, not into an attic. The EPA lists this among its core moisture-control recommendations.
- Vent clothes dryers to the exterior.
- Use a hygrometer to track relative humidity and keep it in the EPA's 30-to-50-percent range.
- Run a dehumidifier in problem rooms, particularly basements and bathrooms.
- Increase ventilation or air movement by opening windows when practical, per EPA guidance. Homes with a heat recovery ventilator (HRV) should keep it running; Natural Resources Canada's ENERGY STAR program specifically recommends this for reducing window condensation.
Raise the surface temperature of the reveal
- Improve airflow across the window. The EPA and Natural Resources Canada both note that heat sources positioned beneath windows, and unobstructed air movement, keep glass and frame surfaces closer to room temperature. Deep sills, closed blinds, and furniture pushed against the wall block that airflow and let cold air pool at the reveal.
- Add insulation at the rough opening. Thermal-bridging research indicates that insulating the gap between the window frame and the wall reduces condensation risk directly, and that windows mounted toward the center of the wall cavity, rather than flush with the exterior, perform better thermally.
- Upgrade to windows with a documented condensation resistance rating. The Fenestration and Glazing Industry Alliance (FGIA), formed from the merger of AAMA and the Insulating Glass Manufacturers Alliance, notes that a window's AAMA Gold Label only confirms structural and water-penetration performance; a separate NFRC 500 condensation resistance rating is needed to know how a specific product performs against condensation. Look for that rating when specifying replacements.
- Choose frame materials and glazing built to reduce thermal bridging. Building-science guidance points to thermally broken aluminum, vinyl, fiberglass, or wood frames, warm-edge spacers instead of conductive metal spacers, and multi-pane glazing with argon or krypton fill, as documented in DOE's consumer guide to energy-efficient windows.
- Add storm windows where full replacement isn't practical. The EPA specifically recommends storm windows, noting that one installed on the interior performs better against condensation than an exterior storm window, because it keeps the primary window pane warmer.
Check for a different cause first
Not every wet reveal is condensation. If water pools in the track even after cleaning, or stains appear that don't track with humidity and temperature, the source may be a failed sill pan, damaged flashing, or a clogged weep hole rather than airborne moisture. AAMA/FGIA glossary guidance describes weep holes as the drainage path that lets wind-driven rain exit the frame to the outside; if they're blocked, water backs up into the reveal and mimics a condensation problem. Clearing them, without damaging any exterior weep covers or insect screens, is manufacturer-recommended maintenance, not a repair job.
Removing existing mold — and keeping it from returning
Once mold has colonized a reveal, humidity control alone won't clean it up. The CDC and EPA both frame mold cleanup as a two-part job: fix the moisture source, then remove the mold itself.
CDC guidance for hard surfaces:
- Clean with soap and water, or a bleach solution of no more than 1 cup of household laundry bleach per gallon of water.
- Never mix bleach with ammonia or other cleaning products; the combination produces toxic gas.
- Ventilate the room, and wear gloves and eye protection while cleaning.
- Follow the product manufacturer's instructions for any commercial cleaner used.
EPA guidance on porous materials: wood trim or drywall that has stayed wet and moldy for an extended period may need to be removed and replaced rather than cleaned, since mold can grow into porous material faster than a surface wipe can remove it.
What doesn't work: the CDC states plainly that painting or caulking over mold does not stop it from growing. The mold has to be physically removed, and the moisture problem behind it has to be fixed, before refinishing the surface.
Neither the CDC nor the EPA recommends routine mold testing. Both agencies note that no federal standard exists for acceptable mold levels indoors, so if mold is visible, the guidance is to remove it and address the moisture source rather than pay for sampling.
Preventing recurrence comes back to the same two levers as prevention in the first place: keep relative humidity in the 30-to-50-percent range, and keep the reveal's surface temperature above the dew point through better airflow, air-sealing, insulation at the rough opening, or a window upgrade with a rated condensation resistance factor. Mold that keeps returning to the same reveal despite cleaning is a signal that one of those two conditions still isn't being met — not a reason to reach for a stronger cleaner.

Get our latest articles!
New and better



Subscribe to updates
Get the latest guides and industry news delivered to your inbox.